Reviews 7
 Server Locations
Server Locations
Server Locations
Hosting MongoDB databases
In recent years, MongoDB has become popular both in academia and professionally. The use of this database system makes it possible to store unstructured data in a very simple way.
Generally, this type of database must be located in an easily accessible environment, as applications that use this database generally need to do so in physically distant locations. Given this need, this article presents a way to store and perform basic operations in MongoDB using a web hosting service. The discussion of this topic is useful for those who want to know how to create and manage MongoDB databases in the cloud. In order to offer solutions for managing this type of database, the article also indicates graphical tools for its administration. Throughout the article, emphasis will be placed on technologies for developing web applications using the Java programming language.
To access the database, a web service will be developed, which will be hosted on a free host. To test the service, a console application in Java language will be developed. Finally, the article shows you how to test and monitor the MongoDB web service and database.
The term NoSQL means Not Only SQL, that is, not only SQL. Other meanings were initially proposed, but the most adopted by the community was this. NoSQL databases emerged to facilitate the storage and processing of data in large volumes, offering a structure that allows high scalability.
There are currently around 150 different NoSQL databases. MongoDB has been gaining new followers due to its vast documentation and involved community.
The MongoDB movement started in early 2009 and since then more features and features have been added to MongoDB, such as support without schema, easy replication, simple API, drivers for different languages, manipulation tools, function updates, and much more.
The NoSQL database group consists of application-oriented databases that manage large volumes of data, adopt scalability features, REST protocol, MapReduce (read BOX 1 ), and other high-performance features.
BOX 1: MapReduce
MapReduce is a programming model introduced by Google with the objective of supporting parallel processing on data sets spread over several computers (cluster). The operation of this model is based on two features: map and reduce. In order to carry out search consolidations whose data is clustered, the requester sends his search to several computers simultaneously.
At this moment, the mapping (map) is made between the requester and the cluster, then the data resulting from the search are grouped (reduce) generating the search result to be delivered to the requester.
The acronym REST stands for Representational state transfer. It is a technique widely used in distributed data manipulation (CRUD) systems using only HTTP calls. This type of call simplifies programming, abstracting low-level tasks to the programmer, enabling the implementation of different routines in web services. The calls made are basically for data insertion (POST), data query (GET), data update (PUT), and data deletion (DELETE).
MongoDB
The first thing to think about when starting with NoSQL is comparative. As we could not fail to talk, we go to the comparison of the main terms in relation to relational banks.
In MongoDB, each document can be completely distinct from another document in the same collection, which is not true in the relational model. Usually, the data is written in BSON (Binary JSON) format.
To follow the steps presented in the next section, it is not necessary to have MongoDB installed on the local computer.
Installation on the local computer is only for the purpose of faster and simpler testing. If the reader wants to install MongoDB on his computer and manipulate it, here are some initial commands that can be useful. To run the service (daemon), you must consider the following command:/mongo. With the service running, we can start the command interpreter:/mongo, the basic commands for listing databases are: show DBS or show databases. To choose a database use (if it does not exist, the database will be created sqlMagazine): use sqlMagazine it is important to be aware of the fact that upper and lower case letters are different, be careful with this detail.
MongoDB Tools
After so many commands, we already have a base to move forward. Knowing the commands is essential to develop applications, however, for administration, there are other graphical tools that are good allies. For example, Figures 1 and 2 were captured from the MongoHub software.
There are other tools to access MongoDB, such as RockMongo and MongoVUE. The RockMongo tool needs other services ( PHP and Apache), in addition to activating the MongoDB module in the PHP configuration. This tool is adopted as a standard in OpenShift, so it is good to have a knowledge of it.
The MongoVUE tool is only for computers with Microsoft Windows operating systems. It offers good features.
For Apple operating system users (Mac OS 10.6.x or higher), there is the MongoHub tool. Although there is a specific website for this tool.
Creating an account to host the application
The objective is to make the database available on the web and enable access to it by an application that is also on the web or by an application that is installed on another computer. The service chosen for hosting the database was OpenShift. In this, the user can create up to three applications and in each of them, it is possible to create several services, such as Java, PHP, Phyton, Ruby applications, among others.
If you want to create more applications on the same account or even hire other services and scalability resources, you must create a paid account. OpenShift offers a platform as a service, identified by the acronym PaaS. Let's go through the necessary steps to create an account.
Initially, the user must go to the OpenShift port address: and choose the option. The registration screen will appear, as shown in Figure.
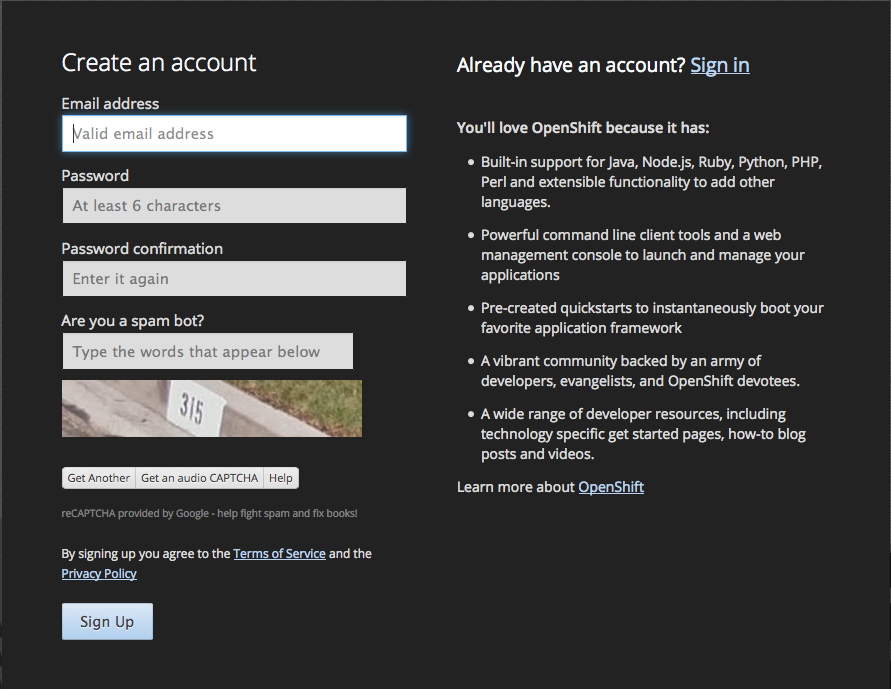
Just enter the data and click on “Sign Up”. An email will be sent to confirm the registration, it is necessary to click on the link in this email to activate the registration and be a to create the applications.
When accessing your OpenShift account, it is possible to create the desired services, instructions are also offered to access applications by command line, use the JBoss Developer Studio IDE, and a multitude of other resources. In order to facilitate this step by step, we will create the application automatically after having developed it locally.
Some settings must be made in our OpenShift account. After accessing the account, we must go to the “Settings” section, as shown in Figure.
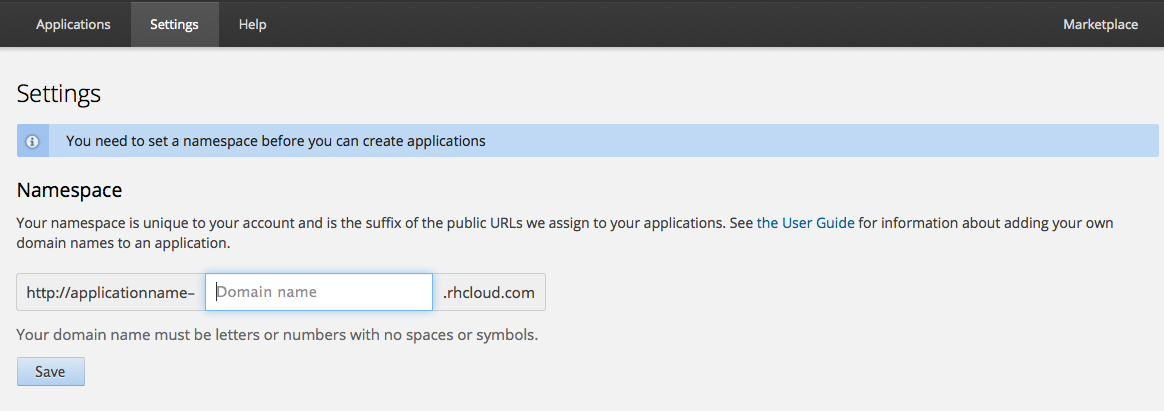
In the text box “Domain name” we must type the name of the desired domain, in this test we type “SQL magazine”. This name (maximum number of characters is 16) is free to choose, however, it is important because it will be used in our Java project. Then click on the “Save” option.
After completing this step, we can return to the “Applications” tab and click on the “Create your first application now” option. A list will appear with various services that we can create. Let's choose “JBoss Application Server 7”. Then the window for choosing the application name is displayed
This name is also free to choose, however it should be an easy name to remember, as we will need it right away. For this test, we type “MongoDB”.
The next step is to click on “Create Application”. This process can take a few seconds or even minutes, wait until the process is complete. Now we can return to the “Applications” tab and click on the created application.
At this point, we are going to add MongoDB to our application. To do this, just click on the application, in this example “mongodb” and then click on “Add MongoDB 2.4”,. If you open a window with information and instructions, the link “Continue to the application overview page” will be displayed, which must be clicked, then it will be possible to click on “Add MongoDB 2.4”.
Then click on “Add Cartridge”. This process can also take a few seconds. A screen will then appear with important information to access the database, it is important to record this information as it will be used in the next steps. The information is username, password, and database name.
At this moment we already have a server (JBoss Application Server) at our disposal and a NoSQL database (MongoDB). Now just create a web service to access this bank and a project to access this web service.
Application development
Basically, we will have two applications and a database. The first application will be responsible for making requests for the database. This application will serve as a very simple example, just to test the functioning of the web service. The second application (web service) will be responsible for receiving requests from the first and accessing the database.
Let's go to the first application. Its prerequisites are Eclipse Kepler and two API libraries (Application Program Interface) Jersey (jersey-client and jersey-core). In order to facilitate and simplify the step-by-step described here, we will make a Java application in Eclipse Kepler.
The images to illustrate the step by step were obtained using the Mac OS 10.9.3 operating system, however, the reader can use Microsoft Windows or even a Linux distribution.
Within Eclipse access: File, New, Project. In the next window choose “Java Project” and click “Next”. Then, enter a name for the project, and choose the option “Finish”.
Now we need to create a class in the project. To do this, just right click on “src”, “New”, “Class”.
On the next screen, we must type a name for the class and check the option “Create the main method” “public static void main (String [] args)”, and click on “Finish”,
This Java project aims to record information in a MongoDB database that will be hosted on the web. The type of hosting used allows external access to the database, that is, applications from anywhere can access the database server, however, it is necessary to redirect ports on the local machine.
As this can become a very complex thing to do when it comes to computers out of our control or even computers that need to continue to access local ports, or even when it comes to mobile devices, port redirection is not the best way. In this way, our Java project will access the database through a web service.
Before entering the codes, let's add two libraries to work with web services. The two libraries that we will use are from the Jersey 1.18 API. To add them to the project, after downloading, just copy them to the project folder and right-click on the project name, and choose properties.
Within the "Properties" window, select the "Java Build Path" option and then "Libraries". Then click on “Add External Jar”.
Now that we have the Jersey API added to our project, we can code a little bit.
In this initial snippet of code, we are just creating a URL client. In the first lines (3 and 4) we have the import to use the methods of the “Jersey” library. In lines 9 and 10 we are creating an object to connect to the web service URL. Note that the web service url is made up of the full name of our OpenShift account along with the word rest and post, indicating that the web service has a location for the methods, called rest and a method called a post. Next, let's create some information to send to the database
The purpose of the code snippet presented in this listing is to assemble a string of characters obeying the JSON standard to be sent to the MongoDB database. Finally, the file to be sent to the server. Now let's go to the last code snippet of the Java project.
This code snippet will need another import for our project.
Sending to the cloud
We can now send our web service to OpenShift. Within Eclipse choose the JBoss perspective and click on OpenShift Application.
Account credentials (email and password) defined in the registration will be requested. Just enter your account details and click "Next". The first time you connect, you are asked to create SSH Keys.
we must check the option “ Use existing application ”. By checking this option, the screen to choose the application created previously will be displayed. Choose the application and click " Next ".
On the next screen, you will be asked if we want to create a project to send to our server or use an existing project. We will use an existing project, in this case, our newly developed web service. To do this, deselect the option “ Create new project ”, click on “ Explore ” and choose the jboss-as-helloworld-rs project.
Finalize the process. You will be asked for confirmation to use the SSH key, click “Yes”. Again “Yes” to confirm the sending of the web service. After this step, we can publish our web service. To do this, go to Eclipse and open the "Servers" tab, click to expand the server tab, in this case "mongodb at OpenShift". The name of our web service jboss-as-helloworld-rs will appear, right-click on it and choose the option “Full Publication ” or “Full Publish”.
Check if the application has already been built on the OpenShift server. To do this, go to the browser and access your OpenShift account on the “Applications” tab and click on the application. In the example in this tutorial, “mongodb”, and confirm that it has already been built.
If it takes too long (more than three minutes), it may be necessary to restart the application. To do this, use the corresponding icon to the right of the screen.
Final tests
Now that we have a server with MongoDB at our disposal, a project to send data to the server, and a web service to bring the two together, we can start testing.
An important ally to check the functioning is Rock Mongo. It can be activated in OpenShift very simply, just click on “ Add Rock Mongo 1.1 ” in the “ Application s” tab.
Another important feature is the “Tail files”, which can be activated on the console. Navigate to the Eclipse console and click on OpenShift Explorer, expand all options until you reach the application, in our case “ mongodb ”. Right-click and choose the “ Tail files ” option.